Outings
August 31, 2014


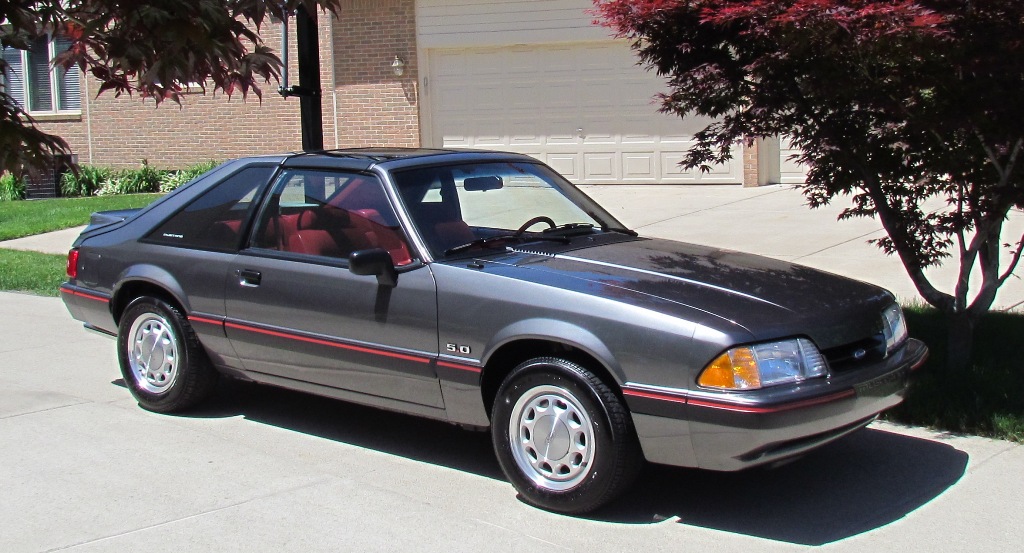
The Mustang made it out for some cruising and showing this summer. As I write this, it has about 250 miles on the odometer. It has been great to finally drive it around. And as best I can tell (since 25 years have elapsed!), it drives just like it did when it was new. The performance was a bit more impressive in 1987 than it is now, though 🙂
The pictures above were taken at its first show, in mid-July at Ford’s Product Development Center in Dearborn. I was relieved it made it there with no issues, since the 20 mile trip was its furthest it had travelled at that point. The neat thing about the show was that the organizers were able to get one stock Mustang from each of the years of Mustang production, all the way from 1964-1/2 to the new 2015. I’ve been to a lot of Mustang events, and had never seen that done before. I was honored that my car got to represent the 1988 model year.
The next show we took it to was the Southwest Michigan Concours in early August. It’s an invitation only event along the shore of Lake Michigan in St. Joseph, MI. They feature cars from the classic era up through the peak of the original muscle car years. Typically there would be nothing as new as a 1988 Mustang, but since it was the Mustang’s 50th anniversary, the show organizers wanted to have one Mustang from each of the car’s generations. It was neat to have our ’88 there representing the Fox body cars. For me the highlight was the many spectators who walked around the car, and commented something along the lines of “boy you can tell this car’s never spent a night outside of a garage”, or “doesn’t have many miles on it, does it.” Big surprises when I filled them in on the history! Mostly, it was just fun to be part of that kind of event, with so many beautiful classics. A few pics below:


Most recently my youngest son, Casey and I took the car to Mustang Alley at the Woodward Dream Cruise. Another distance milestone, as it was over 30 miles each way :). We left the house at a little after 6:00 AM, and drove with the T-Tops off even though it was in the high 40s that morning! Mustang Alley is along 9 Mile Rd to the east side of Woodward, and there were Mustangs door-to-door for what seemed like nearly a mile. I heard there were over a thousand. Ford had a very cool display at the entrance with a time line history of the Mustang, and select years of the car displayed underneath it. We were very fortunate that the event organizers chose our ’88 as one of the two Fox body cars in the display (the other being a really nice black SVO) – it was very cool to be in the center of one of the biggest Mustang events around. It was a beautiful day, and we spent most of it looking at all of the other great cars parked and cruising. The first few pics below were taken early in the morning when the cars were being set up, the last one is later in the day.


A few other odds and ends, since the car wasn’t quite complete when I made the last posting. I finished up the engine compartment in mid-June, including getting the distributor boot on, hood to cowl seal, decals, covers, etc.

I then put it up on my 4-post hoist to torque all the suspension bolts (one of the few times the hoist has ever been used for anything other than an extra parking space for something that doesn’t get driven much…). I snapped a few images of the bottom of the car while it was up there:


After torquing all of the suspension bolts, I did a quick “home alignment” to get it close enough to be able to drive it to the alignment shop. I set the camber by eye, and set the toe using a little home made gauge I used to use when I did a lot auto crossing 20 or so years ago…

Before I drove it to the alignment shop, though, I put 3M Clear Bra on all the painted surfaces behind the front and rear tires and below the black bodyside molding. I wanted to keep it from getting chipped up by rocks thrown from the tires, since I had removed all of the the original factory chip guard (the thick textured stuff) when I stripped the body. The 3M stuff is great, and essentially invisible when installed properly.

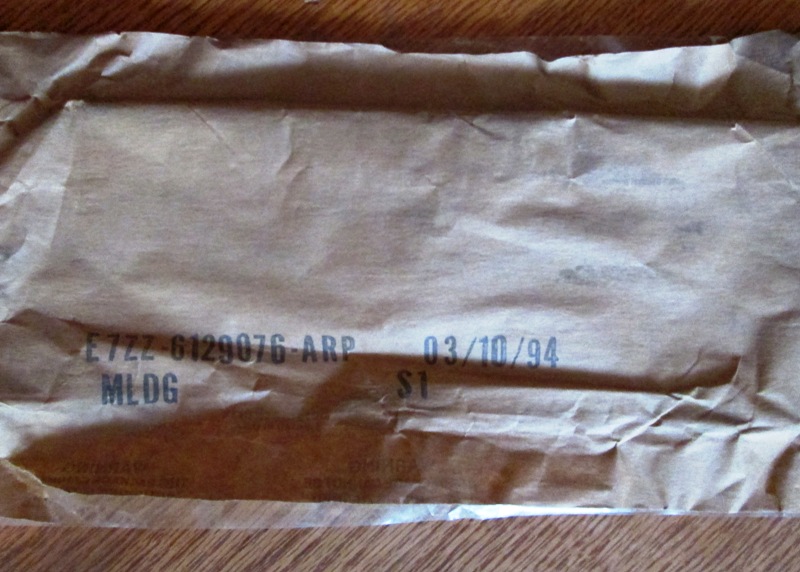
One of the final things I put on was a new reproduction certification decal. I got this from Marti Auto Works when I ordered the Marti Report for the car. They did a nice job with it – the first picture below shows how the new repro compares with the original that I removed from the car before I stripped the paint:


Almost Done!
June 12, 2014
Just a few details left…
With the fenders on, it was time to put the front bumper cover on. Once again, it took me hours of adjusting to get it to a level of fit that I was satisfied with. I had to drill out a few of the rivets holding the bumper to the fiberglass reinforcement to shift it a bit, before putting new rivets in.

Now for the front lamps. The parking lamps are NOS pieces. The front main lamps were given to me by a friend that had picked up a few extra sets in the early 90s because of the yellowing problem these lamps had. He’d sold the car, and never ended up using them. I felt bad that he didn’t want any money for them. He passed away not long after he gave them to me. As he was such a huge Mustang lover, I consider their presence on my car now to be a nice memory of him. He’d have been happy with where they ended up…


Next job was finishing out the front wheel wells. First parts to go in were a set of NOS fender stuffers. These are the fiber insulators that block tire/road noise from passing through the door seals. I bought these many years ago, too, and for what I considered stupid money at the time… but the originals were toast and I wanted everything to be correct.

… and a set of NOS front wheel liners to make the stupidly expensive fender stuffers invisible 🙂

These turned out to be a bear to install, too. They just did not want to bend into all the right places at the same time. Once I finally got them in, they fit well, but it was probably 2.5 hours to do the first one, and another hour to do the second. I’d like to have seen how the folks back on the assembly line did it in ~60 seconds!

After that I installed the windshield moldings, the cowl panel, and the wipers. I had refinished all of them with SEM Trim Black to match the rest of the car’s black trim.

The next bits to go on were the bodyside moldings. First I cleaned the side of the car really well with aerosol glass cleaner so the adhesive would stick.
 I had purchased a set of NOS moldings many years ago as well.
As you can see from the above picture, they had been packaged 20 years ago. Turns out leaving them in the package for that long was not good for them. The adhesive on the clear side of the package had eaten into the black molded rubber. I tried cleaning them, but the surface was “pitted”. So I had to thoroughly clean them with solvent, wet sand them for a few hours, and refinish them with SEM Trim Black. They turned out beautiful, but it would have been much nicer to just take them out of the package and put them on! One other word of warning about NOS moldings: on the back side there’s a little tab that looks like its purpose was to help the assembly line workers align the moldings to the doors, or to close out the gaps that would have been left by the stamped depression in the body (or both…). Anyway, that tab wasn’t properly lined up on several of my parts (should have been more centered), and had a lot of extra rubber flash around it. This would keep it from seating properly against the body, or eventually push the ends of the molding away from the body. See pic below of the tab I’m talking about. I used a razor blade to trim the extra off before installing the moldings.

To get the moldings lined up nicely, I first ran a piece of guide tape all the way along the side. Then I used blocks of wood taped up against the car to support/level the moldings before pushing them against the body. Once they’re stuck on, they pretty much don’t want to come un-stuck, so you get one chance.


And finally, the piece de resistance… the 5.0 badges for the fenders. I had an NOS set, of course – a gift to me from my wife on the Christmas after we’d repurchased the car. The irony in this is that I had actually removed them “back in the day” for a stealthier look! I found several references on the web from people who had graciously measured the position of their original badges.
![]()
![]()
And that pretty much completes the exterior of the car! Time to bolt on the wheels and tires, drop it onto the ground, start it up, and drive it out into the daylight. The pictures below reflect the furthest distance this car has made it out of my garage in the 14 years since the restoration started, and the first time it has moved an inch under its own power in the same time period.


The images below of the car were taken in the same spot in my driveway. The first one in ~August 2000 – the last time it moved before I started tearing it apart. And then the current one on June 6, 2014. The Japanese Maple tree in front of the car gives a bit of perspective on the time that’s passed!


It’s not “done” yet. I still have some under hood work to do (install distributor boot, coil cover, rear hood margin seal, rad support decals, and charge up the A/C system). Then a front end alignment, and it will be time for a cruise…
Winter 2013/14 Projects
May 14, 2014
I don’t normally get much done on the car during the winter, since it’s cold in the garage and it’s the time of year I get my indoor home projects done. But since I want/need to have the car done this summer, I did work on it this past winter (indoors as much as possible…). The first to be addressed were the wheels. I had picked up a really nice set of 10-hole wheels many years ago. They had no curb rash or salt damage, but the clear coat had developed a lot of really fine cracking over the years. So I wanted to re-clear them. First I wet sanded them all with 400 grit, without sanding through the original clear, so I’d have a nice flat surface for the new clear.

Note the casting date on the wheels: April 20, 1988 (2nd shift) – made in 1988, but a bit after my car was actually produced, in the fall of 87.

I wanted to use a quality urethane clear, but to save the hassle of getting out the paint gun, cleaning it, etc., I used the 2K stuff you can buy in a can from auto paint jobbers now. It’s got a 48 hour life once activated, but one can would be the right amount for the 4 wheels and caps, with very little wasted.

Note that since this stuff has isocyanates in it, you need to use a decent respirator and paint in a ventilated area.

The 4-wheels and caps with a fresh coat of clear. They turned out great – very high gloss.

With the wheels done, I did some work on the front bumper assembly. I had previously painted the front bumper cover, but needed to assemble it to the reinforcement. I had purchased a new reinforcement from Ford way back in the 90s.

along with a new front bumper Ford oval badge (beside the original):

To install the bumper cover to the reinforcement requires large rivets and a special rivet gun. Some places sell these rivet guns for crazy money, but I got mine at Harbor Freight on sale for under $20.

The first step was getting the bumper cover fit to the reinforcement, which took a bit of finesse:

Once it was positioned correctly, I was able to install the rivets. Note the freshly installed Ford oval badge, too :):
 Then I reinstalled the bumper-to-fender mounting plates, which I had replated when I got all the nuts and bolts done.

The final step was to apply the red stripe to the section of black molding. I had originally ordered the car with the optional red body side molding stripes, but I think the dealer forgot to include it when they rolled my order from being an ’87 model to an ’88 model. So the car was originally built without them, but now I’m getting it the way I wanted it in the first place…

The next mini project was to get the doors and related systems finished up. I started with the glass guides. Here’s how they looked to start:

To restore the “fuzzy stuff”, I used the loop side of some Velcro material, after carefully and thoroughly cleaning off the old stuff:

and the finished product ready to reinstall in the doors:

Next up I reinstalled the exterior door handles onto the doors. I had to replace the driver side handle, as it had broken like so many do. The replacement is made of die cast metal, whereas the originals are plastic. I had to have my son hold the door handle in position while I riveted it on (same large rivet gun as used above for the bumper cover). That was a bit nerve racking, as it takes a lot of force on the gun to pop those rivets, and I was worried about the rivet gun “recoiling” and scratching the paint. We got them on OK, though.

The original lock cylinders were reinstalled as well.

Next to go on the doors were the exterior belt trim and mirror. Again, I had all NOS pieces, purchased back when I first got the car back in the late ’90s.

As you can see in the picture below, even NOS parts don’t always fit so well. These outer glass sweeps didn’t have anything close to the right curvature on them, and had to be carefully hand bent to the correct shape.

Once I tweaked them, they were riveted in place. Amazing to me how many parts on this car are riveted on, as it’s very rare to see rivets used on production cars built today.

And the next part to get riveted… the retainers for the door outer belt moldings:

The door outer belt mouldings then slide in place over the retainers, and are held on with a single screw at the back:

The final pieces to install were the door mirrors, which I had previously refinished. Note they are the “flag” style mirrors that went into production on convertibles part way into the ’88 model year, just in time to catch the very last few T-Top cars ever built (T-Top cars used convertible doors). Probably only a month worth of ’88 T-Top cars got these mirrors before production of T-Top cars stopped, so they’re fairly rare (vs. the ones that mount the mirror in the forward corner of the door/window opening that were used on all the earlier cars).

Next up was to hook the battery up and run the window glass up and set it. It would be the first time the glass had moved in about 15 years, …except when I connected the window switch the glass didn’t actually move. No power to the motor. I am not an electrical genius, so it took me awhile to trace the issue. Turned out when I had reinstalled the dash, the power lead for the windows got trapped in the cowl side area. Since I hadn’t seen the connector, nothing got connected to it. After figuring that out and getting the glass to move, I had to tweak the glass adjustment to get it to seal as well as possible to the new seals. The factory manual for “Repairing T-Top Water Leaks” has great instructions for adjusting the glass. It’s available for free download from http://www.foureyedpride.com/
The final step to completing the doors was installing the door trim panels. I had previously restored the door panel cards themselves, but I still needed to re-do the armrests. I replaced the driver side armrest (badly warped/crushed) with an NOS one I had picked up sometime over the years. It was black, so needed to be recolored, as did the rest of the pieces to ensure a good match to the interior. First step was a very thorough cleaning – an important step to getting good results with the dye:

Pieces ready for the SEM Color Coat, after cleaning and light sanding, and cleaning again:

And after the Color Coat – this stuff leaves a great finish:

The door switch bezel plates always warped from heat, so again I had picked up some NOS pieces many years ago:

Next I disassembled the switches to clean all the dirt and dust out of them, clean the corrosion off the contacts, etc.

Here’s the new switch bezel installed:

And the completed armrest assembly, with armrest pad reinstalled:

Time to put it all back in the car. First I reinstalled the original door water shields, then installed the door panels:

And finally the armrest/switches, and the door release handle bezel. The doors (and the entire interior!) are now completely done.

The next part to go on was the original buck tag, which is screwed into the radiator support on the driver side. The “TR” code is for T-Roof.

And the final update for this installment of the blog – installation of the fenders. I wrapped the edges in tape to keep them from getting scratched, then proceeded to spend MANY hours playing around with the adjustment of the hood and two fenders until I got them to where I was happy. I’m sure I could do it much faster if I had to do it again…

Tape removed. Not many parts left to go on…!

T-Tops reinstalled
December 14, 2013
The T-Tops on this car are its most unique feature. 1988 was the last year T-Tops were available on a Mustang, and they were only installed on cars built during the first few months of production that year. Most went on GTs, so an LX with T-Tops is pretty uncommon. The T-Top assemblies themselves were a bit different on ’87-’88 cars than they were on the earlier Mustangs – the aluminum extrusion that forms the outer edge and retains the glass does not have a drip rail like the early model year cars did.
I had removed the T-Tops and stored them when I first started the restoration 13 years ago. I wrapped them in blankets and put them on a shelf in my basement – wanted to protect them since they were in nice shape. “Best laid plans”….., anyway it turned out my basement walls leaked a bit during heavy storms, and the blankets were touching the wall, so they soaked all the water up. Unbeknownst to me they were filled up with water pretty frequently, so when I went to get the T-Tops out they looked like they’d spent some time in the ocean. The metal latching mechanism components were pretty rusty.

So I disassembled all of the latching mechanism components:

Then I removed the old weather stripping and adhesive from the T-Tops.

Then cleaned them up with Prep Solvent, sanded the outer surfaces with 400 grit paper, and masked off the glass for painting:

I painted them with SEM Trim Black, the same stuff I’ve used for all of the other exterior black trim, so everything matches up nice.

After that I installed new seals. I had acquired a set of NOS T-Top seals years ago, so I fit them into the channels and retained them with 3M Weather Strip Adhesive. I also sealed all around the edges of the seals with the 3M stuff, which is how they were done originally.


Now time to clean up and reinstall the latching/locking mechanisms. There was nothing I could do to “fix” the lock cylinders. They are made of pot metal, and were pitted terribly. I searched around for a replacement set, and finally found some at a place that carries a lot of NOS Ford stuff. I was happy to get them, but they were pricey.

I bead blasted or wire wheeled all of the other latch parts, brackets, and screws:

One other thing I’d noticed when I took them apart originally, was that the plastic bushings that the rods slide in (there are three per T-Top assembly) were broken or missing in many cases. Fortunately I have a set of “parts T-Tops” that I cannibalized for the replacement bushings I needed, and I used JB Weld epoxy to retain them in the brackets so they couldn’t slide out or get cocked up and break.

Finally, I got everything back together and reinstalled on the T-Tops. I tested fitted the tops on the car because the end brackets that control the rod position need to be adjusted pretty carefully so the rods engage the end caps on the body correctly to position the tops relative to the body.

From there I needed to get the plastic covers that hide the latching mechanism refinished. These are ALWAYS cracked and warped on every car I’ve ever seen. I was fortunate enough to find one NOS cover a long time ago, and wish I could have found another. After looking at how they attach, it’s clear why they crack. They attach to the T-Tops on only one side, and they are screwed in with screws that are larger than the pre-drilled holes in the plastic. I assume they did that because of the cantilevered attachment – the screw need to retain AND position the plastic cover. But it puts so much stress on the plastic that it would crack very quickly. I drilled the holes out so this would not happen on mine. I also put some epoxy behind the holes on the one used cover I had that was decent so it would be less likely to crack more in the future.

After that, I cleaned them up thoroughly, lightly sanded them, and re-shot them with the SEM Color Coat flexible interior dye to match all the rest of the black interior bits. The NOS cover is the white one in the top picture below.


The last step was to install new foam gaskets that fill the gap around where the handle comes through the cover. These are available repro, thankfully, and I used the 3M weather strip adhesive to retain them to the covers.

I then installed the covers onto the T-Tops, and put the T-Tops onto the car. They’ve been off the car for more than half its life while it’s sat in my garage – nice to finally see them back in place!


Seats and Console
November 1, 2013
I finally reached the point where it was time to put the seats in the car. The seats are a good example of how I can get a little OCD about things at times. When I got the car, the seats that were in it were all junk — covered in tar, dirt, etc. I threw them away as soon as we got the car home. Then I started the search for replacements. This was almost 15 years ago, and replacement seat covers weren’t available then. And apparently they still aren’t, in spite of being advertised in NPD’s latest catalog. I called NPD to inquire, and they told me the supplier has been unable to provide them…
Anyway, I searched Ebay, Craigslist, etc. for good red LX seats. They were hard to find, because the red faded very quickly to a dull orange when exposed to the sun. Plus red fell out of style pretty hard for awhile, and I think a lot of people just threw them away when they swapped them for some other color, or for GT seats. The first set of seats I was able to find were probably a 6 out of 10, but I bought them, because I’d been looking for awhile and they were the only semi-decent red LX seats I’d found. So I kept looking – next set I went to see months later were 7s, so I bought them since they were better than what I had. But I kept looking… a trip to Pittsburgh to pick up a set that were 8s. Then finally a trip to Akron, OH to pick up a set that were 9s. Then I did actually stop looking! All of these seats prompted much ridicule from my wife, of course 🙂
Back to the present – I installed the rear seats and hatchback area carpet first. Before doing that, I refinished the spare tire and jack, and installed the tire board (another part that’s not easy to find in good condition). No pictures of the latter, though, as my camera was out of service at the time. Here are the rear seats – I gave them a good cleaning with my upholstery cleaner before installing them:


I installed the console assembly, shifter, and radio before putting the front seats in. The radio was a part I got off eBay many years ago, it had been removed from an ’88 when it was brand new to be exchanged for an aftermarket unit. The shift knob came from my ’94 GT, I removed it when the car was new and replaced it with a leather Cobra shift knob – so it still has perfect graining.

I had to hunt all over my basement to find all the different front seats I’d collected way back when. I put them all in one place to make sure I was selecting the nicest ones 🙂

And finally, into the car:


Summer 2013 — It Runs!
August 13, 2013
Home remodeling and other projects kept me away from the car for the entire Spring, but I finally got back onto it in July. It was time to get the radiator, fan and hoses, etc. in. I had picked up somebody’s take-out stock 5.0/5-speed radiator many years ago. Before I cleaned and repainted it, I pressure checked it with the free (gotta love that) rental pressure checking tool from the local auto parts store.

It held 15 PSI with no leaks, so good to go. I cleaned it up, straightened the cooling fins out, and repainted it in semi-gloss black. Then on to the fan shroud. The original shroud was mangy looking, and didn’t clean up well with the usual chemical products. So I lightly sanded it and cleared it, and it turned out nice.

Then I installed a new Ford coolant recovery bottle to it.

Next I restored the upper radiator support brackets that hold the radiator and radiator isolators at the top. They were solid, but the paint was flaking off them so I bead blasted them and repainted them, and cleaned all the grime off the rubber isolators.


Time to put the radiator and shroud into the car:

All of the yellow paint had worn off my original coolant recovery bottle cap, so I cleaned that and repainted the yellow on it, then cleaned up the original radiator cap with steel wool.


I picked up some new Ford radiator hoses probably 10 or 12 years ago. One difference in the service parts (and I think even the production cars switched shortly after mine was built) was that the protective sleeve on the upper radiator hose where it passes over the alternator was made of plastic convolute.

My car originally had the rubber sleeve at the bottom of the above photo, so I replaced the plastic convolute with it. I tried to get it on first with warm soapy water, but no go — needed to use Vaseline. No wonder they stopped using them in production…

After that I put the hoses on, filled the system with antifreeze, and checked the pressure again. Unbelievably, no leaks! I put the fan (my original cleaned up really nice, so the new I had bought years ago wasn’t needed) and FEAD belt on, and that was it for the cooling system.


Getting really close to starting it (eh, trying to start it…) now. I filled all the fluids (axle, trans, engine oil, power steering fluid, brake fluid). I have never in my life added or removed trans fluid without a ton of it ending up on the floor, and my streak is still alive….
I pulled the distributor to prime the engine, then put in a new Motorcraft battery. First thing I did after connecting the battery cables was to beep the horn, and it actually worked. Amazing! I pulled the coil wire so the car wouldn’t start too quickly, and turned the ignition key to accessory. I heard that good old Mustang fuel pump whine. So far so good. Then I turned it to start and the starter turned the engine until the oil pressure gauge had a steady reading. I connected the coil wire and did it again. It turned over forever, and wouldn’t start. So I got my wife to turn the key and started hunting down potential issues. Spark was good. I aimed the timing light and adjusted the timing a bit while my wife was turning the engine over, then all of a sudden the engine caught and RAN. I think it was probably because it just took awhile to get fuel to fill up the filter, lines, rails, etc. Anyway, it ran, and ran smoothly. See the YouTube video for proof. It doesn’t sound that great in the video because of where the microphone/camera is, but in person it sounds just like a stock 5.0 Mustang.
http://www.youtube.com/watch?v=0Yi4HZvc0FA&feature=em-upload_owner
I had told my wife the chances of getting it to start on the first attempt were no better than 15%. The last time it ran was over 13 years ago, and after having disassembled every nut, bolt, and wire in the car (and not taken nearly enough notes or pictures), I was just certain I had to have overlooked something. Guess not…!
I still have a lot of interior and body parts to put on, but should be able to have it all done by the end of the year.
Door Trim Panels
March 29, 2013
I’m still waiting for the weather to warm up enough to get back out into the garage, but in the meantime I decided to restore the door trim panels since I can do that indoors 🙂
You can buy new reproduction door trim panels, but they’re over $400 for the pair, and I figure like so many other reproductions, they’re probably close to right, but not quite correct appearing.
The vinyl on mine is in good shape – no rips or tears. The problems are that they’re caked with dirt/grease/dust, the cloth insert in the center of the panel is faded badly, the speaker grille retention bosses have broken off, and the lower carpet is dirty. All fixable – here’s what they looked like at the start:

The first step was to remove the fabric covered insert. It’s retained with some metal tabs that go through the backing substrate and are bent – they just need to be “unbent” to remove the panel. The speaker grilles are heat staked to the backing board, but two of the staking bosses were broken (this is a really common issue on these cars – the resto places sell new grilles for $40 – $50 for a pair). Here’s the panel with those things removed:

First thing to take on was recovering the fabric insert panels. The fabric is just wrapped around the backing board and held with trim adhesive and staples. I removed the staples and carefully separated the fabric.

Next I used the backing board as a template to cut out new fabric. The fabric is from a big role of NOS ribbed fabric I picked up many years ago. It’s ink stamp dated 1989 on the back side. Here’s the fabric and the old and new pieces:


Next was to reattach the new fabric to the backing board. I used 3M Trim Adhesive, and some pinch clamps around the corners to hold it tight while the adhesive set up:

Here are the finished inserts:

On to the speaker grilles. I cut the plastic heat stakes off the grilles to remove them from the door panel (they aren’t designed to be removed and reinstalled). In the picture below you can also see where two of the bosses had broken. I marked them so I’d know where they were located, then I cut them off.

I used J-B Weld epoxy to bond some metal threaded posts I got at Lowes to the backside of the grilles. The posts come with mating large head screws, so they are perfect for reattaching the speaker grilles. Plus they will now be removable if needed, which they weren’t originally.

Next step for the speaker grilles was to refinish them. They get kicked a lot, so they had a lot of grease and dirt ground into them. I did the usual anal retentive cleaning/prep job. Several scrubbings with Simple Green and a tooth brush, followed by sanding with 400 grit, then a couple more cleanings with plastic prep solvent. Then I coated them with the SEM Color Coat:


Finally I needed to clean and recolor the main panels themselves. Cleaning them was a pain. Since they have the cardboard backing, a hose won’t work! So I did about three rounds with the Simple Green and a toothbrush, removing the residue with clean rags – they were really dirty/greasy/Armor-Ally. After that I again lightly sanded them, and went over them several times with the plastic prep solvent. I cleaned the carpet with Simple Green, Woolite, and the hand held attachment of my carpet cleaner — that turned out really well.

After the cleaning, I masked off the red areas to be recolored. Even though the vinyl cleaned up really nice, the original red is a slightly different shade than the SEM Color Coat I’ve been using for all the rest of the interior. So to ensure it all matched, I recolored these, too.

And here’s the panel after the red and black vinyl sections were recolored:

The final step was to reinstall the fabric trim piece, and the speaker grille. It all turned out very nice:

I’ll do the armrests next.
Marti Report
January 22, 2013
I had heard that Marti Reports were now available for Fox Mustangs, so I ordered one(http://www.martiauto.com/).
A copy is below. It’s the first I’ve seen an “official” number of T-Top cars produced in 1988: 863 cars. I also ordered a new door certification decal from them, since my original was in sorry shape and I peeled it off before I repainted the car.

Fall 2012 Filling Up the Engine Compartment
November 25, 2012
Having got the instrument panel into the car, along with the various electrical harnesses that connect into it, I wanted to get back to getting the components mounted in the engine compartment and to the engine that all the electrical connectors go to…
I started with the intake manifold, A/C receiver/dryer bottle and hose (new Ford bits), and the distributor. I’ll have to pull the distributor to prime the engine when it’s time, but I wanted to get it in place.

Next on the engine were the heater hoses (new), EGR system, throttle body, and belt tensioner (new). And then the air pump and hoses. The air pump was a new unit from Ford, and I refinished my original pulley since the new one didn’t come with a pulley. The air pump hoses are refinished originals, and the diverter valves are new.


Next in was a new alternator. I refinished an original pulley I’d picked up awhile ago, since the car had underdrives on it when I repurchased it.

Next in was the power steering pump. I got a new Ford pump, but again reused the original pulley and bracket. Removing the pulley from the original pump takes a special tool (I borrowed it from my local auto parts store)…. and a lot of heat.


And finally over the Thanksgiving weekend I put in the A/C compressor (new Ford), A/C condenser lines (new Ford), the air induction system (cleaned and re-oiled the K&N filter), the battery tray, and the lamp harness. The A/C compressor came without a pulley or clutch, so I refinished my old pulley, and installed a new clutch bearing and clutch hub (more jobs that require special tools). A funny thing about the air induction silencer… the resonator thing that mounts outside the front fender well. It’s the original to the car that I removed when it was like 6 months old. Then I never reinstalled it when I sold the car (who would…?), and somehow managed to hang onto it along with my other car junk through all these years. Even more amazingly, I actually found it. So it’s now “back home”.
I spent a full day going through all the hose and electrical harness routings to make them match the way the car was originally built. Many were layered incorrectly since I’d put the car together in a different order than they did at the assembly plant. Special thanks to my friend Nick for giving me access to his low mileage original ’88 GT T-Top as reference – he is a guru of Fox body Mustangs!
So the pics below are where I got to this year with it. Time to move indoors and work on some home projects for the winter again. Odds are looking good at having a first crack at “turning the key” next summer, though!


Instrument Panel
August 5, 2012
The next project was the instrument panel. When I tore the car apart, there was nothing really wrong with it other than the padded section on the passenger side was all puffed out from sun damage, and the whole thing was a dirty mess.

I had pretty much disconnected everything from the rest of the car and pitched it all in the basement, so when I dug it back out, here’s what I had:

Step one was to remove all the wiring and HVAC system ducts (taking good notes/photos to help with reassembly):

Once I had the panel stripped down to just the bare plastic piece, it was time for the cleaning and recoloring process. I cleaned it twice with Simple Green and a sponge, rinsed it off, then lightly sanded all the surfaces, then finally wiped it down a few times with DuPont Plastic Prep. Here it is after the prep:

And then after the red is done:

Next is masking off the red parts to spray the black:

Then spraying the black (SEM Satin Black):

Masking removed:

Next was to color the passenger side pad. I’d acquired a new one from Ford a long time ago, and the only color they came in at that time was grey.


In order to get the re-coloring process to look correct and factory (most of the parts were painted from the factory, too, even when they were molded in color), it’s important to take everything apart down to the component level and do the pieces separately. Below sequence shows the HVAC registers dissassembled, prepped, and re-colored:


I also needed to re-do the factory white pad printing on the registers for the “open” and “closed” position. I masked them off and used white acrylic paint:


Now it was time to start reassembling all the pieces back onto the panel:

And then reattaching the steel frame (I cleaned the light surface rust off with a wire wheel) and reinstalling all the wiring (also cleaned and rewrapped):

Finally – in the car it all goes:

Next to do was recolor the black pieces that go on the instrument panel, including the cluster surround, defroster grille, and speaker grilles:


The next part to add in was the cluster. When I had gotten the car back, it had a Police spec 160 mph speedo in it, instead of the 85 mph unit it should have had. So I sold the Police unit for big bucks on eBay, and got a cheap 1988 model 85 mph take-out from someone (who had probably removed it to put in an expensive 160 mph unit!). I love the red highlighted 55 mph. The dark ages…

With that installed in the cluster, I was able to reinstall the cluster, along with a new multifunction/turn signal switch.

The final bits were the steering wheel and kick panels. Over the years, I’ve probably bought six different steering wheels, always trying to find one a bit nicer. My wife gives me lots of grief for this OCD stuff…. but I had a few really good wheels to pick from! And that’s it for now for the instrument panel. There’s plenty more to do on the interior, but those will be projects for next year.

